Areas
| WP | Area | n | NM | Hell | Clue |
|---|---|---|---|---|---|
| Rogue Encampment | — | — | — | Have fun :) | |
| Blood Moor | 1 | 36 | 67 | Follow roads | |
| Den of Evil | 1 | 36 | 79 | Corpsefire | |
| Cold Plains | 2 | 36 | 68 | Follow roads | |
| The Cave L1 | 2 | 36 | 77 | ||
| The Cave L2 | 2 | 37 | 78 | ||
| Burial Grounds | 3 | 36 | 80 | ||
| Crypt | 3 | 37 | 83 | ||
| Mausoleum | 3 | 37 | 85 | ||
| Stony Field | 4 | 37 | 68 | Stones on road | |
| Tristram | 6 | 39 | 76 | ||
| Underground Passage L1 | 4 | 37 | 69 | Go straight | |
| Underground Passage L2 | 4 | 38 | 85 | ||
| Dark Wood | 5 | 38 | 68 | ||
| Black Marsh | 6 | 38 | 69 | ||
| Tower Cellar L1 | 7 | 38 | 75 | Go left | |
| Tower Cellar L2 | 7 | 39 | 76 | Go left | |
| Tower Cellar L3 | 7 | 40 | 77 | Go left | |
| Tower Cellar L4 | 7 | 41 | 78 | Go left | |
| Tower Cellar L5 | 7 | 42 | 79 | Countess | |
| The Hole L1 | 5 | 38 | 80 | Go left | |
| The Hole L2 | 5 | 39 | 81 | ||
| Tamoe Highland | 8 | 39 | 69 | Follow roads | |
| The Pit L1 | 7 | 39 | 85 | ||
| The Pit L2 | 7 | 40 | 85 | ||
| Monastery Gate | 8 | 40 | 70 | ||
| Outer Cloister | 9 | 40 | 70 | ||
| Barracks | 9 | 40 | 70 | Go left | |
| Jail L1 | 10 | 41 | 71 | Go straight | |
| Jail L2 | 10 | 41 | 71 | Go straight | |
| Jail L3 | 10 | 41 | 71 | Go left | |
| Inner Cloister | 10 | 41 | 72 | Exit straight-right | |
| Cathedral | 11 | 42 | 72 | ||
| Catacombs L1 | 11 | 42 | 72 | ||
| Catacombs L2 | 11 | 42 | 73 | Go right from WP | |
| Catacombs L3 | 12 | 43 | 73 | ||
| Catacombs L4 | 12 | 43 | 73 | Andariel | |
| Secret Cow Level | 28 | 64 | 81 | Cow King | |
| Lut Gholein | — | — | — | ||
| Sewers L1 | 13 | 43 | 74 | Enter from docks | |
| Sewers L2 | 13 | 43 | 74 | Go left from WP | |
| Sewers L3 | 14 | 44 | 75 | Go left, Radament | |
| Rocky Waste | 14 | 43 | 75 | ||
| Stony Tomb L1 | 12 | 44 | 85 | Go left | |
| Stony Tomb L2 | 12 | 44 | 85 | Go left for chest, str. for boss | |
| Dry Hills | 15 | 44 | 76 | ||
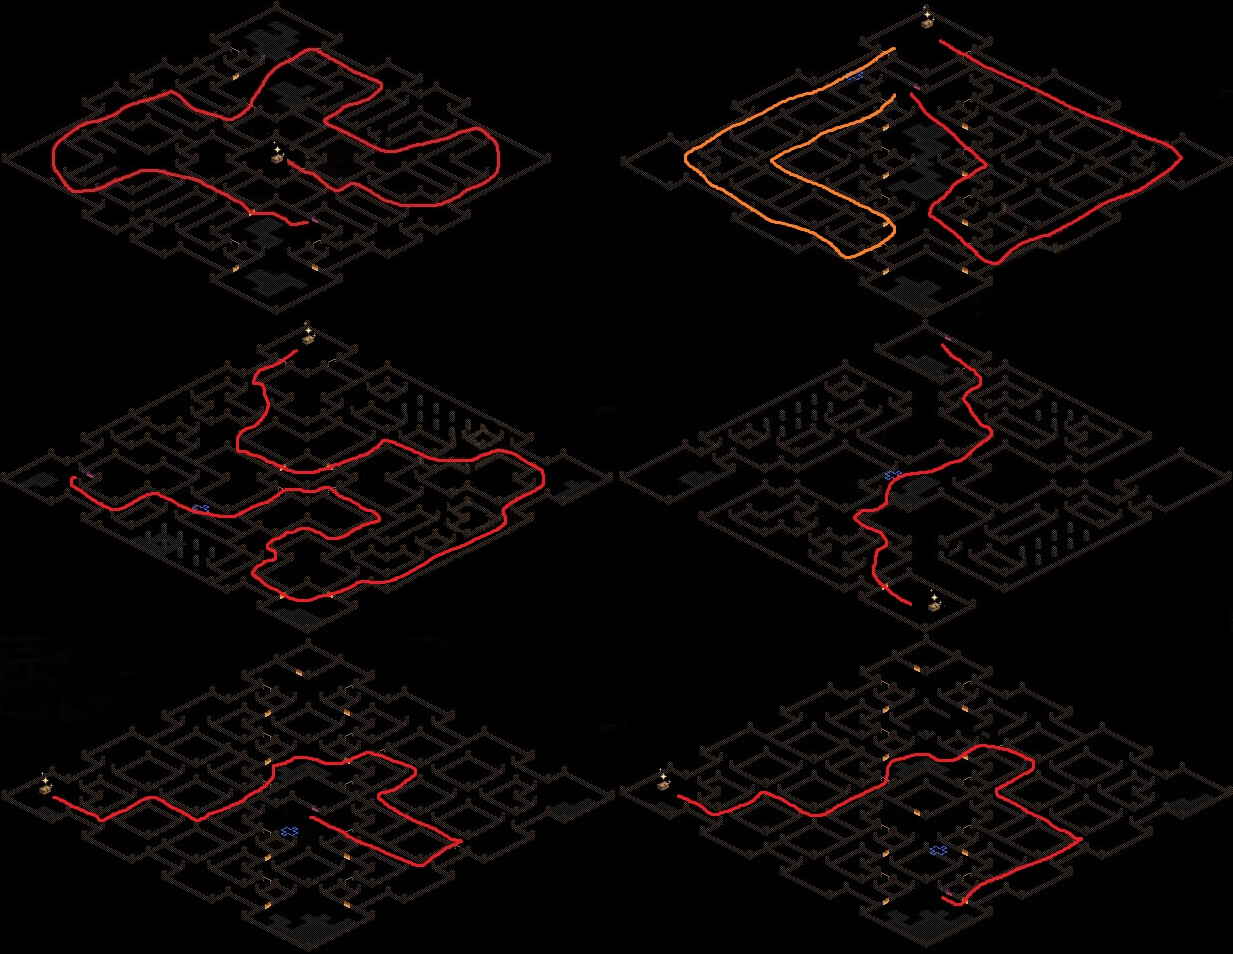
| Halls of the Dead L1 | 12 | 44 | 79 | Go left | |
| Halls of the Dead L2 | 13 | 45 | 81 | Go left | |
| Halls of the Dead L3 | 13 | 45 | 82 |
 Go left for Cube Go left for Cube
|
|
| Far Oasis | 16 | 45 | 76 | ||
| Maggot Lair L1 | 17 | 45 | 84 | Go right | |
| Maggot Lair L2 | 17 | 45 | 84 | Go right | |
| Maggot Lair L3 | 17 | 46 | 85 |
 Go straight for Staff Go straight for Staff
|
|
| Lost City | 17 | 46 | 77 | Endless night begins | |
| Ancient Tunnels | 17 | 46 | 85 | Go left | |
| Valley of Snakes | 18 | 46 | 77 | ||
| Claw Viper Temple L1 | 14 | 47 | 82 | Go left | |
| Claw Viper Temple L2 | 14 | 47 | 83 |
 Amulet Amulet
|
|
| Harem | — | — | — | ||
| Harem L2 | 13 | 47 | 78 | Run along edges | |
| Palace Cellar L1 | 13 | 47 | 78 | Run along edges | |
| Palace Cellar L2 | 13 | 47 | 78 | Run along edges | |
| Palace Cellar L3 | 13 | 48 | 78 | Portal in center | |
| Arcane Sanctuary | 14 | 48 | 79 | True tomb omitted | |
| Canyon of the Magi | 16 | 48 | 79 |

|
|
| Tal Rasha's Tomb | 17 | 49 | 80 | Go left | |
| Tal Rasha's Chamber | 17 | 49 | 80 | Duriel | |
| Kurast Docks | — | — | — | ||
| Spider Forest | 21 | 49 | 79 | Cavern is far from WP | |
| Arachnid Lair | 21 | 50 | 85 | ||
| Spider Cavern | 21 | 50 | 79 |
 Eye Eye
|
|
| Great Marsh | 21 | 50 | 80 | ||
| Flayer Jungle | 22 | 50 | 80 | ||
| Swampy Pit L1 | 21 | 51 | 85 | Go left | |
| Swampy Pit L2 | 21 | 51 | 85 | Go left | |
| Swampy Pit L3 | 21 | 51 | 85 | ||
| Flayer Dungeon L1 | 22 | 51 | 81 | Go left | |
| Flayer Dungeon L2 | 22 | 51 | 82 | Go left | |
| Flayer Dungeon L3 | 22 | 51 | 83 |
 Brain in maze
|
|
| Lower Kurast | 22 | 52 | 80 | ||
| Kurast Bazaar | 22 | 52 | 81 | ||
| Disused Fane | 23 | 53 | 85 | ||
| Ruined Temple | 23 | 53 | 85 |
 L.E.'s Tome L.E.'s Tome
|
|
| Sewers L1 | 23 | 52 | 85 | Go right from chest | |
| Sewers L2 | 24 | 53 | 85 |
 Heart Heart
|
|
| Upper Kurast | 23 | 52 | 81 | ||
| Forgotten Temple | 24 | 54 | 85 | ||
| Forgotten Reliquary | 23 | 53 | 85 | ||
| Kurast Causeway | 24 | 53 | 81 | ||
| Disused Reliquary | 24 | 54 | 85 | ||
| Ruined Fane | 24 | 54 | 85 | ||
| Travincal | 24 | 54 | 82 |
 Flail Flail
|
|
| Durance of Hate L1 | 25 | 55 | 83 | Go left | |
| Durance of Hate L2 | 25 | 55 | 83 | Go left from WP | |
| Durance of Hate L3 | 25 | 55 | 83 | Mephisto | |
| Pandemonium Fortress | — | — | — | ||
| Outer Steppes | 26 | 56 | 82 | ||
| Plains of Despair | 26 | 56 | 83 | Izual | |
| City of the Damned | 27 | 57 | 84 | ||
| River of Flame | 27 | 57 | 85 | Go straight | |
| Chaos Sanctuary | 28 | 58 | 85 | Diablo | |
| Harrogath | — | — | — | ||
| Bloody Foothills | 24 | 58 | 80 | ||
| Frigid Highlands | 25 | 59 | 81 | ||
| Abaddon | 39 | 60 | 85 | ||
| Arreat Plateau | 26 | 60 | 81 | ||
| Pit of Acheron | 39 | 61 | 85 | ||
| Crystalline Passage | 29 | 61 | 82 | Go left | |
| Frozen River | 29 | 61 | 82 | ||
| Nihlathak's Temple | 32 | 63 | 83 | Pindleskin | |
| Halls of Anguish | 33 | 63 | 83 | ||
| Halls of Pain | 34 | 64 | 84 | WP fixed to exit | |
| Halls of Vaught | 36 | 64 | 84 | Follow decor to Nihlathak | |
| Glacial Trail | 29 | 61 | 83 | Go left | |
| Drifter Cavern | 29 | 61 | 85 | ||
| Frozen Tundra | 27 | 60 | 81 | ||
| Infernal Pit | 39 | 62 | 85 | ||
| Ancients' Way | 29 | 62 | 82 | Go left | |
| Icy Cellar | 29 | 62 | 85 | ||
| Arreat Summit | 37 | 68 | 87 | Ancients | |
| Worldstone Keep L1 | 39 | 65 | 85 | ||
| Worldstone Keep L2 | 40 | 65 | 85 | Go right from WP | |
| Worldstone Keep L3 | 42 | 66 | 85 | ||
| Throne of Destruction | 43 | 66 | 85 | ||
| Worldstone Chamber | 43 | 66 | 85 | Baal | |
| Secret Cow Level | 28 | 64 | 81 | Cow King | |
| Forgotten Sands | — | — | 83 | Über Duriel | |
| Furnace of Pain | — | — | 83 | Über Izual | |
| Matron's Den | — | — | 83 | Lilith | |
| Über Tristram | — | — | 83 | Pandemonium |
Runes / Gems
| Rune | Clvl | Utility | Countess | Cows | Chests | Forge | Cube Upward |
|---|---|---|---|---|---|---|---|
 El El
| 11 | n | n | A2 | n |
3 ×
El
→
 Eld
Eld
|
|
|
Eld
| 11 | n | n | A2 | n |
3 ×
Eld
→
 Tir
Tir
|
|
|
Tir
| 13 | n | n | A2 | n |
3 ×
Tir
→
 Nef
Nef
|
|
|
Nef
| 13 | n | n | A2 | n |
3 ×
Nef
→
 Eth
Eth
|
|
|
Eth
| 15 | n | n | A3 | n |
3 ×
Eth
→
 Ith
Ith
|
|
|
Ith
| 15 | n | n | A3 | n |
3 ×
Ith
→
 Tal
Tal
|
|
|
Tal
| 17 | n | n | A3 | n |
3 ×
Tal
→
 Ral
Ral
|
|
|
Ral
| 19 | n | n | A3 | n |
3 ×
Ral
→
 Ort
Ort
|
|
|
Ort
| 21 | NM | n | A3 | n |
3 ×
Ort
→
 Thul
Thul
|
|
|
Thul
| 23 | NM | n | A4 | n |
3 ×
Thul
+ Chipped Topaz
→ Chipped Topaz
→
 Amn
Amn
|
|
|
Amn
| 25 | NM | n | A4 | n |
3 ×
Amn
+ Chipped Amethyst
→ Chipped Amethyst
→
 Sol
Sol
|
|
|
Sol
| 27 | NM | n | A4 | NM |
3 ×
Sol
+ Chipped Sapphire
→ Chipped Sapphire
→
 Shael
Shael
|
|
|
Shael
| 29 | NM | n | A5 | NM |
3 ×
Shael
+ Chipped Ruby
→ Chipped Ruby
→
 Dol
Dol
|
|
|
Dol
| 31 | NM | n | A5 | NM |
3 ×
Dol
+ Chipped Emerald
→ Chipped Emerald
→
 Hel
Hel
|
|
|
Hel
| — | NM | NM | A1 NM | NM |
3 ×
Hel
+ Chipped Diamond
→ Chipped Diamond
→
 Io
Io
|
|
|
Io
| 35 | NM | NM | A1 NM | NM |
3 ×
Io
+ Flawed Topaz
→ Flawed Topaz
→
 Lum
Lum
|
|
|
Lum
| 37 | NM* | NM | A2 NM | NM |
3 ×
Lum
+ Flawed Amethyst
→ Flawed Amethyst
→
 Ko
Ko
|
|
|
Ko
| 39 | NM* | NM | A2 NM | NM |
3 ×
Ko
+ Flawed Sapphire
→ Flawed Sapphire
→
 Fal
Fal
|
|
|
Fal
| 41 | Hell | NM | A3 NM | NM |
3 ×
Fal
+ Flawed Ruby
→ Flawed Ruby
→
 Lem
Lem
|
|
|
Lem
| 43 | Hell | NM | A3 NM | NM |
3 ×
Lem
+ Flawed Emerald
→ Flawed Emerald
→
 Pul
Pul
|
|
|
Pul
| 45 | Hell | NM | A4 NM | NM |
2 ×
Pul
+ Flawed Diamond
→ Flawed Diamond
→
 Um
Um
|
|
|
Um
| 47 | Hell | NM | A4 NM | NM |
2 ×
Um
+ Topaz
→ Topaz
→
 Mal
Mal
|
|
|
Mal
| 49 | Hell | NM | A5 NM | Hell |
2 ×
Mal
+ Amethyst
→ Amethyst
→
 Ist
Ist
|
|
|
Ist
| 51 | Hell | NM | A5 NM | Hell |
2 ×
Ist
+ Sapphire
→ Sapphire
→
 Gul
Gul
|
|
|
Gul
| 53 | Hell* | Hell | A1 Hell | Hell |
2 ×
Gul
+ Ruby
→ Ruby
→
 Vex
Vex
|
|
|
Vex
| 55 | Hell* | Hell | A1 Hell | — |
2 ×
Vex
+ Emerald
→ Emerald
→
 Ohm
Ohm
|
|
|
Ohm
| 57 | Hell* | Hell | A2 Hell | — |
2 ×
Ohm
+ Diamond
→ Diamond
→
 Lo
Lo
|
|
|
Lo
| 59 | Hell* | Hell | A2 Hell | — |
2 ×
Lo
+ Flawless Topaz
→ Flawless Topaz
→
 Sur
Sur
|
|
|
Sur
| 61 | — | Hell | A3 Hell | — |
2 ×
Sur
+ Flawless Amethyst
→ Flawless Amethyst
→
 Ber
Ber
|
|
|
Ber
| 63 | — | Hell | A3 Hell | — |
2 ×
Ber
+ Flawless Sapphire
→ Flawless Sapphire
→
 Jah
Jah
|
|
|
Jah
| 65 | — | Hell | A4 Hell | — |
2 ×
Jah
+ Flawless Ruby
→ Flawless Ruby
→
 Cham
Cham
|
|
|
Cham
| 67 | — | Hell | A4 Hell | — |
2 ×
Cham
+ Flawless Emerald
→ Flawless Emerald
→
 Zod
Zod
|
|
|
Zod
| 69 | — | Hell | A5 Hell | — |
| Tier | Gem | Clvl | Drops |
|---|---|---|---|
| I | Chipped Amethyst |
1 | A1 |
| II | Flawed Amethyst |
5 | A2 |
| III | Amethyst |
12 | A3 |
| IV | Flawless Amethyst |
15 | NM |
| V |  Perfect Amethyst Perfect Amethyst |
18 | Forge/Cube only |
| I | Chipped Diamond |
1 | A1 |
| II | Flawed Diamond |
5 | A2 |
| III | Diamond |
12 | A3 |
| IV |  Flawless Diamond Flawless Diamond |
15 | NM |
| V |  Perfect Diamond Perfect Diamond |
18 | Forge/Cube only |
| I | Chipped Emerald |
1 | A1 |
| II | Flawed Emerald |
5 | A2 |
| III | Emerald |
12 | A3 |
| IV | Flawless Emerald |
15 | NM |
| V |  Perfect Emerald Perfect Emerald |
18 | Forge/Cube only |
| I | Chipped Ruby |
1 | A1 |
| II | Flawed Ruby |
5 | A2 |
| III | Ruby |
12 | A3 |
| IV | Flawless Ruby |
15 | NM |
| V |  Perfect Ruby Perfect Ruby |
18 | Forge/Cube only |
| I | Chipped Sapphire |
1 | A1 |
| II | Flawed Sapphire |
5 | A2 |
| III | Sapphire |
12 | A3 |
| IV | Flawless Sapphire |
15 | NM |
| V |  Perfect Sapphire Perfect Sapphire |
18 | Forge/Cube only |
| I |  Chipped Skull Chipped Skull |
1 | A1 |
| II |  Flawed Skull Flawed Skull |
5 | A2 |
| III |  Skull Skull |
12 | A3 |
| IV |  Flawless Skull Flawless Skull |
15 | NM |
| V |  Perfect Skull Perfect Skull |
18 | Forge/Cube only |
| I | Chipped Topaz |
1 | A1 |
| II | Flawed Topaz |
5 | A2 |
| III | Topaz |
12 | A3 |
| IV | Flawless Topaz |
15 | NM |
| V |  Perfect Topaz Perfect Topaz |
18 | Forge/Cube only |
Runewords
| Runeword | Rating | Clvl | Soc. | Item Class | Rune #1 | Rune #2 | Rune #3 | Rune #4 | Rune #5 | Rune #6 |
|---|---|---|---|---|---|---|---|---|---|---|
| Beast | 63 | 5os | Axes / Hammers / Scepters |
Ber
|
Tir
|
Um
|
Mal
|
Lum
| ||
| Black | 35 | 3os | Clubs / Hammers / Maces |
Thul
|
Io
|
Nef
| ||||
| Bulwark LDR | 35 | 3os | Helms |
Shael
|
Io
|
Sol
| ||||
| Call to Arms | 57 | 5os | Weapons |
Amn
|
Ral
|
Mal
|
Ist
|
Ohm
| ||
| Chains of Honor | 63 | 4os | Armor |
Dol
|
Um
|
Ber
|
Ist
| |||
| Enigma | 65 | 3os | Armor |
Jah
|
Ith
|
Ber
| ||||
| Fortitude | 59 | 4os | Weapons / Armor |
El
|
Sol
|
Dol
|
Lo
| |||
| Grief | 59 | 5os | Axes / Swords |
Eth
|
Tir
|
Lo
|
Mal
|
Ral
| ||
| Heart of the Oak | 55 | 4os | Maces* / Staves |
Ko
|
Vex
|
Pul
|
Thul
| |||
| Hysteria LDR | 39 | 3os | Armor |
Shael
|
Ko
|
Eld
| ||||
| Infinity | 63 | 4os | Polearms / Spears |
Ber
|
Mal
|
Ber
|
Ist
| |||
| Insight | 27 | 4os | Polearms / Staves / Bows / Crossbows |
Ral
|
Tir
|
Tal
|
Sol
| |||
| Mosaic LDR | 53 | 53os | Claws |
Mal
|
Gul
|
Amn
| ||||
| Obedience | 41 | 5os | Polearms / Spears |
Hel
|
Ko
|
Thul
|
Eth
|
Fal
| ||
| Rhyme | 29 | 2os | Shields / Heads / Books |
Shael
|
Eth
| |||||
| Smoke | 37 | 2os | Armor |
Nef
|
Lum
| |||||
| Spirit | 25 | 4os | Swords / Shields |
Tal
|
Thul
|
Ort
|
Amn
| |||
| Stealth | 17 | 2os | Armor |
Tal
|
Eth
| |||||
| Treachery | 43 | 3os | Armor |
Shael
|
Thul
|
Lem
| ||||
| Wealth | 43 | 3os | Armor |
Lem
|
Ko
|
Tir
| ||||
| White | 35 | 2os | Wands |
Dol
|
Io
| |||||
| Ancient's Pledge | 21 | 3os | Shields |
Ral
|
Ort
|
Tal
| ||||
| Authority | 29 | 3os | Armor |
Hel
|
Shael
|
Ral
| ||||
| Breath of the Dying | 69 | 6os | Weapons |
Vex
|
Hel
|
El
|
Eld
|
Zod
|
Eth
| |
| Delirium | 51 | 3os | Helms |
Lem
|
Ist
|
Io
| ||||
| Dream | 65 | 3os | Helms / Shields |
Io
|
Jah
|
Pul
| ||||
| Edge | 25 | 3os | Missile Weapons |
Tir
|
Tal
|
Amn
| ||||
| Exile | 57 | 4os | Paladin Shields |
Vex
|
Ohm
|
Ist
|
Dol
| |||
| Faith | 65 | 4os | Missile Weapons |
Ohm
|
Jah
|
Lem
|
Eld
| |||
| Flickering Flame | 55 | 3os | Helms |
Nef
|
Pul
|
Vex
| ||||
| Harmony | 39 | 4os | Missile Weapons |
Tir
|
Ith
|
Sol
|
Ko
| |||
| Hearth LDR | 35 | 3os | Helms |
Shael
|
Io
|
Thul
| ||||
| Last Wish | 65 | 6os | Axes / Hammers / Swords |
Jah
|
Mal
|
Jah
|
Sur
|
Jah
|
Ber
| |
| Leaf | 19 | 2os | Staves |
Tir
|
Ral
| |||||
| Lore | 27 | 2os | Helms |
Ort
|
Sol
| |||||
| Mania LDR | 39 | 3os | Weapons |
Shael
|
Ko
|
Eld
| ||||
| Metamorphosis LDR | 67 | 3os | Helms |
Io
|
Cham
|
Fal
| ||||
| Obsession | 69 | 6os | Staves |
Zod
|
Ist
|
Lem
|
Lum
|
Io
|
Nef
| |
| Peace | 29 | 3os | Armor |
Shael
|
Thul
|
Amn
| ||||
| Phoenix | 65 | 4os | Weapons / Shields |
Vex
|
Vex
|
Lo
|
Jah
| |||
| Splendor | 37 | 2os | Shields / Heads / Books |
Eth
|
Lum
| |||||
| Steel | 13 | 2os | Axes / Mace / Swords |
Tir
|
El
| |||||
| Stone | 47 | 4os | Armor |
Shael
|
Um
|
Pul
|
Lum
| |||
| Voice of Reason | 43 | 4os | Mace / Swords |
Lem
|
Ko
|
El
|
Eld
| |||
| Void | 69 | 3os | Daggers |
Thul
|
Zod
|
Ist
| ||||
| Bone | 37 | 3os | Armor |
Sol
|
Um
|
Um
| ||||
| Bramble | 61 | 4os | Armor |
Ral
|
Ohm
|
Sur
|
Eth
| |||
| Brand | 65 | 4os | Missile Weapons |
Jah
|
Lo
|
Mal
|
Gul
| |||
| Chaos | 57 | 3os | Claws |
Fal
|
Ohm
|
Um
| ||||
| Coven | 51 | 3os | Helms |
Ist
|
Ral
|
Io
| ||||
| Crescent Moon | 47 | 3os | Axes / Polearms / Swords |
Shael
|
Um
|
Tir
| ||||
| Cure LDR | 35 | 3os | Helms |
Shael
|
Io
|
Tal
| ||||
| Death | 55 | 5os | Axes / Swords |
Hel
|
El
|
Vex
|
Ort
|
Gul
| ||
| Destruction | 65 | 5os | Polearms / Swords |
Vex
|
Lo
|
Ber
|
Jah
|
Ko
| ||
| Doom | 67 | 5os | Axes / Hammers / Polearms |
Hel
|
Ohm
|
Um
|
Lo
|
Cham
| ||
| Dragon | 61 | 3os | Armor / Shields |
Sur
|
Lo
|
Sol
| ||||
| Duress | 47 | 3os | Armor |
Shael
|
Um
|
Thul
| ||||
| Enlightenment | 45 | 3os | Armor |
Pul
|
Ral
|
Sol
| ||||
| Eternity | 63 | 5os | Melee Weapons |
Amn
|
Ber
|
Ist
|
Sol
|
Sur
| ||
| Famine | 65 | 4os | Axes / Hammers |
Fal
|
Ohm
|
Ort
|
Jah
| |||
| Fury | 65 | 3os | Melee Weapons |
Jah
|
Gul
|
Eth
| ||||
| Gloom | 47 | 3os | Armor |
Fal
|
Um
|
Pul
| ||||
| Ground LDR | 35 | 3os | Helms |
Shael
|
Io
|
Ort
| ||||
| Hand of Justice | 67 | 4os | Weapons |
Sur
|
Cham
|
Amn
|
Lo
| |||
| Holy Thunder | 23 | 4os | Scepters |
Eth
|
Ral
|
Ort
|
Tal
| |||
| Honor | 27 | 5os | Melee Weapons |
Amn
|
El
|
Ith
|
Tir
|
Sol
| ||
| Ice | 65 | 4os | Missile Weapons |
Amn
|
Shael
|
Jah
|
Lo
| |||
| King's Grace | 25 | 3os | Scepters / Swords |
Amn
|
Ral
|
Thul
| ||||
| Kingslayer | 53 | 4os | Axes / Swords |
Mal
|
Um
|
Gul
|
Fal
| |||
| Lawbringer | 43 | 3os | Hammers / Scepters / Swords |
Amn
|
Lem
|
Ko
| ||||
| Lionheart | 41 | 3os | Armor |
Hel
|
Lum
|
Fal
| ||||
| Malice | 15 | 3os | Melee Weapons |
Ith
|
El
|
Eth
| ||||
| Melody | 39 | 3os | Missile Weapons |
Shael
|
Ko
|
Nef
| ||||
| Memory | 37 | 4os | Staves |
Lum
|
Io
|
Sol
|
Eth
| |||
| Mist | 67 | 5os | Bows / Crossbows |
Cham
|
Shael
|
Gul
|
Thul
|
Ith
| ||
| Myth | 25 | 3os | Armor |
Hel
|
Amn
|
Nef
| ||||
| Nadir | 13 | 2os | Helms |
Nef
|
Tir
| |||||
| Oath | 59 | 4os | Axes / Mace / Swords |
Shael
|
Pul
|
Mal
|
Lum
| |||
| Passion | 43 | 4os | Weapons |
Dol
|
Ort
|
Eld
|
Lem
| |||
| Pattern | 23 | 3os | Claws |
Tal
|
Ort
|
Thul
| ||||
| Plague | 67 | 3os | Swords / Claws / Daggers |
Cham
|
Shael
|
Um
| ||||
| Pride | 67 | 4os | Polearms / Spears |
Cham
|
Sur
|
Io
|
Lo
| |||
| Principle | 55 | 3os | Armor |
Ral
|
Gul
|
Eld
| ||||
| Prudence | 49 | 2os | Armor |
Mal
|
Tir
| |||||
| Radiance | 27 | 3os | Helms |
Nef
|
Sol
|
Ith
| ||||
| Rain | 49 | 3os | Armor |
Ort
|
Mal
|
Ith
| ||||
| Rift | 53 | 4os | Polearms / Scepters |
Hel
|
Ko
|
Lem
|
Gul
| |||
| Ritual | 57 | 3os | Daggers |
Amn
|
Shael
|
Ohm
| ||||
| Sanctuary | 49 | 3os | Shields |
Ko
|
Ko
|
Mal
| ||||
| Silence | 55 | 6os | Weapons |
Dol
|
Eld
|
Hel
|
Ist
|
Tir
|
Vex
| |
| Strength | 25 | 2os | Melee Weapons |
Amn
|
Tir
| |||||
| Temper LDR | 35 | 3os | Helms |
Shael
|
Io
|
Ral
| ||||
| Unbending Will | 35 | 6os | Swords |
Fal
|
Io
|
Ith
|
Eld
|
El
|
Hel
| |
| Venom | 49 | 3os | Weapons |
Tal
|
Dol
|
Mal
| ||||
| Vigilance | 53 | 2os | Shields / Heads / Books |
Dol
|
Gul
| |||||
| Wind | 61 | 2os | Melee Weapons |
Sur
|
El
| |||||
| Wisdom | 45 | 3os | Helms |
Pul
|
Ith
|
Eld
| ||||
| Wrath | 63 | 4os | Missile Weapons |
Pul
|
Lum
|
Ber
|
Mal
| |||
| Zephyr | 21 | 2os | Missile Weapons |
Ort
|
Eth
|
Faster Cast Rate (FCR)
| Class/Form → Frames | 19 | 18 | 17 | 16 | 15 | 14 | 13 | 12 | 11 | 10 | 9 | 8 | 7 |
|---|---|---|---|---|---|---|---|---|---|---|---|---|---|
 Amazon
|
0 | 7 | 14 | 22 | 32 | 48 | 68 | 99 | 152 | ||||
 Assassin
|
0 | 8 | 16 | 27 | 42 | 65 | 102 | 174 | |||||
 Barbarian
|
0 | 9 | 20 | 37 | 63 | 105 | 200 | ||||||
 Druid
— Human
Druid
— Human
|
0 | 4 | 10 | 19 | 30 | 46 | 68 | 99 | 163 | ||||
|
Druid
— Werebear
|
0 | 7 | 15 | 26 | 40 | 63 | 99 | 163 | |||||
|
Druid
— Werewolf
|
0 | 6 | 14 | 26 | 40 | 60 | 95 | 157 | |||||
 Necro
— Human
Necro
— Human
|
0 | 9 | 18 | 30 | 48 | 75 | 125 | ||||||
|
Necro
— Vampire
|
24 | 35 | 48 | 65 | 86 | 120 | 180 | ||||||
 Paladin
|
0 | 9 | 18 | 30 | 48 | 75 | 125 | ||||||
 Sorceress
— Light.
Sorceress
— Light.
|
0 | 7 | 15 | 23 | 35 | 52 | 78 | 117 | 194 | ||||
|
Sorceress
— Other
|
0 | 9 | 20 | 37 | 63 | 105 | 200 | ||||||
 Warlock
|
0 | 9 | 18 | 30 | 48 | 75 | 125 | ||||||
 Merc
— Iron Wolf
Merc
— Iron Wolf
|
0 | 8 | 15 | 26 | 39 | 58 | 86 | 138 |
Your character must perform a spellcast animation each time you use certain skills.
Items with Faster Cast Rate reduce the amount of
frames that the animation costs you, allowing you to
perform more actions in a shorter amount of time.
This improves Teleport speed, your effective DPS, and how quickly
you can set up skill combos.
For example: As a Sorceress, if you have a total of at least 35% FCR, your
Lightning spells will only take 15 animation frames to cast rather than the base 19.
Faster Hit Recovery (FHR)
| Class/Form → Frames | 15 | 14 | 13 | 12 | 11 | 10 | 9 | 8 | 7 | 6 | 5 | 4 | 3 | 2 |
|---|---|---|---|---|---|---|---|---|---|---|---|---|---|---|
|
Amazon
|
0 | 6 | 13 | 20 | 32 | 52 | 86 | 174 | 600 | |||||
|
Assassin
|
0 | 7 | 15 | 27 | 48 | 86 | 200 | |||||||
|
Barbarian
|
0 | 7 | 15 | 27 | 48 | 86 | 200 | |||||||
|
Druid
— Human 1H
|
0 | 3 | 7 | 13 | 19 | 29 | 42 | 63 | 99 | 174 | 456 | |||
|
Druid
— Human 2H
|
0 | 5 | 10 | 16 | 26 | 39 | 56 | 86 | 152 | 377 | ||||
|
Druid
— Werebear
|
0 | 5 | 10 | 16 | 24 | 37 | 54 | 86 | 152 | 360 | ||||
|
Druid
— Werewolf
|
0 | 9 | 20 | 42 | 86 | 280 | ||||||||
|
Necro
— Human
|
0 | 5 | 10 | 16 | 26 | 39 | 56 | 86 | 152 | 377 | ||||
|
Necro
— Vampire
|
0 | 2 | 6 | 10 | 16 | 24 | 34 | 48 | 72 | 117 | ||||
|
Paladin
— Spears / Staves
|
0 | 3 | 7 | 13 | 20 | 32 | 48 | 75 | 129 | 280 | ||||
|
Paladin
— Other Weapons
|
0 | 7 | 15 | 27 | 48 | 86 | 200 | |||||||
|
Sorceress
|
0 | 5 | 9 | 14 | 20 | 30 | 42 | 60 | 86 | 142 | 280 | |||
|
Warlock
|
0 | 5 | 10 | 16 | 26 | 39 | 56 | 86 | 152 | 377 | ||||
 Merc
— Rogue
Merc
— Rogue
|
0 | 6 | 13 | 20 | 32 | 52 | 86 | 174 | 600 | |||||
 Merc
— Desert
Merc
— Desert
|
0 | 5 | 9 | 14 | 20 | 30 | 42 | 60 | 86 | 133 | 232 | 600 | ||
|
Merc
— Iron Wolf
|
8 | 13 | 18 | 24 | 32 | 46 | 63 | 86 | 133 | 232 | 600 | |||
 Merc
— Barbarian
Merc
— Barbarian
|
0 | 7 | 15 | 27 | 48 | 86 | 200 |
If your character suffers a hit that deals at least 8% of their HP in damage, you will be forced into a hit-recovery animation. If you are being hit repeatedly, this can result in you being stunlocked in place. Items with Faster Hit Recovery decrease the amount of time you spend performing this animation.
Faster Block Rate (FBR)
| Class/Form → Frames | 13 | 12 | 11 | 10 | 9 | 8 | 7 | 6 | 5 | 4 | 3 | 2 | 1 |
|---|---|---|---|---|---|---|---|---|---|---|---|---|---|
|
Amazon
— 1HS
|
15 | 23 | 29 | 40 | 56 | 80 | 120 | 200 | 480 | ||||
|
Amazon
— Other
|
0 | 13 | 32 | 86 | 600 | ||||||||
|
Assassin
|
0 | 13 | 32 | 86 | 600 | ||||||||
|
Barbarian
|
0 | 9 | 20 | 42 | 86 | 280 | |||||||
|
Druid
— Human
|
0 | 6 | 13 | 20 | 32 | 52 | 86 | 174 | 600 | ||||
|
Druid
— Werebear
|
0 | 5 | 10 | 16 | 27 | 40 | 65 | 109 | 223 | ||||
|
Druid
— Werewolf
|
0 | 7 | 15 | 27 | 48 | 86 | 200 | ||||||
|
Necro
|
0 | 6 | 13 | 20 | 32 | 52 | 86 | 174 | 600 | ||||
|
Paladin
— Base
|
0 | 13 | 32 | 86 | 600 | ||||||||
|
Paladin
— Holy Shield
|
0 | 86 | |||||||||||
|
Sorceress
|
0 | 7 | 15 | 27 | 48 | 86 | 200 | ||||||
|
Warlock
|
0 | 6 | 13 | 20 | 32 | 52 | 86 | 174 | 600 |
After your character successfully blocks an attack, they are forced to play a blocking animation. Items with Faster Block Rate decrease the amount of time you spend in this animation so that you can block again.
Useful Cube Recipes
Red Portals / Events
In Diablo II: Resurrected, the Cow King can be killed with no penalty.
To open the portal, you must be in Act I.
For the Pandemonium event, keys only drop in Hell difficulty.
The random portal recipe will not send you to repeat destinations
within the same game, so it's wisest to collect 3 of each key before starting.
Complete all organ harvesting in a single game.
To open the Pandemonium portals, you must be standing in Hell Harrogath.
See also: Full Pandemonium info.
 Wirt's Leg Wirt's Leg |
+ |  Tome of Town Portal Tome of Town Portal |
→ |  Portal to The Secret Cow Level Portal to The Secret Cow Level |
||
 Key of Terror (Countess) Key of Terror (Countess) |
+ | Key of Hate (Summoner) |
+ | Key of Destruction (Nihl.) |
→ | Random Pandemonium portal |
 Mephisto's Brain (Über Izual) Mephisto's Brain (Über Izual) |
+ |  Diablo's Horn (Lilith) Diablo's Horn (Lilith) |
+ | Baal's Eye (Über Duriel) |
→ | Portal to Über Tristram |
Respecing
If you have exhausted all three of your respecs from Akara, you can
craft a Token using Essence drops from Hell bosses.
The chance to recieve an Essence from a boss is about 1 in 32.
 Twisted Essence Twisted Essence |
+ |  Charged Essence Charged Essence |
+ |  Burning Essence Burning Essence |
+ |  Festering Essence Festering Essence |
→ |  Token of Absolution Token of Absolution |
| ↳ from Hell Andariel/Duriel | ↳ from Hell Mephisto | ↳ from Hell Diablo | ↳ from Hell Baal |
Recycling
Re-rolled items will retain no modifiers, including being ethereal or socketed. Only the most-used recipes are shown, see all cube recipies.
 Magic item
|
+ | 3 × Perfect Gems | → |
Reroll of magic item, same level (best on Charms from Hell bosses)
|
 Rare item
|
+ |
6 × Perfect Skulls
|
→ |
Lower-quality reroll of rare item (best on Diadems, which are fixed)
|
3 ×  Magic Amulet
|
→ |
 Magic Ring (at 0.75 × Clvl), best on level 80+ characters
|
||
3 ×  Magic Ring
|
→ |
 Magic Amulet (at 0.75 × Clvl), best on level 80+ characters
|
||
3 ×  Rejuvenation Potion
|
→ |
 Full Rejuvenation Potion
|
||
2 ×  Quivers of Arrows
|
→ |
 Quiver of Bolts (random quantity)
|
||
|
2 ×
Quivers of Bolts
|
→ |
Quiver of Arrows (random quantity)
|
||
Repairing and Recharging
The Cube allows you to recharge or repair items that are otherwise prohibitively expensive to fix at vendors (such as items with Teleport charges).
| Ort |
+ | Weapon | → | Repaired weapon | ||
| Ral |
+ | Armor | → | Repaired armor | ||
| Ort |
+ | Weapon | + | Any Chipped Gem | → | Repaired and recharged weapon |
| Ral |
+ | Armor | + | Any Flawed Gem | → | Repaired and recharged armor |
Socket Work
The amount of sockets added to an item cannot exceed the natural maximum. The game rolls a number between 1-6 for all items and gives your item that number of sockets or the maximum, if the number exceeds the maximum. For example, on a Monarch, the game rolls 1-6, and there is a 50% chance to receive 4 sockets. For more information, see this article.
| Ral |
+ | Amn |
+ | Perfect Amethyst |
+ | Non-superior white weapon | → | Socketed weapon of same type |
| Tal |
+ | Amn |
+ | Perfect Ruby |
+ | Non-superior white shield | → | Socketed shield of same type |
| Ral |
+ | Thul |
+ | Perfect Sapphire |
+ | Non-superior white helm | → | Socketed helm of same type |
| Tal |
+ | Thul |
+ | Perfect Topaz |
+ | Non-superior white armor | → | Socketed armor of same type |
| Hel |
+ |
 Scroll of Town Portal
|
+ | Any socketed item | → | Destroys all items in sockets | ||
Upping Equipment
Weapons and armor that are not already elite-quality base items can be “upped”
to the next tier using the recipes below.
Beware that the item requirements will also increase.
| Ort |
+ | Amn |
+ | Perfect Sapphire |
+ | Normal Rare Weapon | → | Exceptional Rare Weapon |
| Ral |
+ | Thul |
+ | Perfect Amethyst |
+ | Normal Rare Armor | → | Exceptional Rare Armor |
| Fal |
+ | Um |
+ | Perfect Sapphire |
+ | Exceptional Rare Weapon | → | Elite Rare Weapon |
| Ko |
+ | Pul |
+ | Perfect Amethyst |
+ | Exceptional Rare Armor | → | Elite Rare Armor |
| Ral |
+ | Sol |
+ | Perfect Emerald |
+ | Normal Set Weapon | → | Exceptional Set Weapon |
| Tal |
+ | Shael |
+ | Perfect Diamond |
+ | Normal Set Armor | → | Exceptional Set Armor |
| Lum |
+ | Pul |
+ | Perfect Emerald |
+ | Exceptional Set Weapon | → | Elite Set Weapon |
| Ko |
+ | Lem |
+ | Perfect Diamond |
+ | Exceptional Set Armor | → | Elite Set Armor |
| Ral |
+ | Sol |
+ | Perfect Emerald |
+ | Normal Unique Weapon | → | Exceptional Unique Weapon |
| Tal |
+ | Shael |
+ | Perfect Diamond |
+ | Normal Unique Armor | → | Exceptional Unique Armor |
| Lum |
+ | Pul |
+ | Perfect Emerald |
+ | Exceptional Unique Weapon | → | Elite Unique Weapon |
| Ko |
+ | Lem |
+ | Perfect Diamond |
+ | Exceptional Unique Armor | → | Elite Unique Armor |
Renewed Sundering Charms
These recipes reduce the penalty for a Sundering Charm and then add six new random effects.
 Latent Black Cleft
|
+ | Perfect Diamond |
+ | Mal |
+ |
 Northern
+ Northern
+
 Southern
+ Southern
+
 Deep Deep
|
→ |
Renewed Black Cleft
|
 Latent Bone Break
|
+ | Perfect Amethyst |
+ | Pul |
+ | Northern Worldstone Shard |
→ |
Renewed Bone Breal
|
 Latent Cold Rupture
|
+ | Perfect Sapphire |
+ | Lum |
+ |  Eastern Worldstone Shard Eastern Worldstone Shard |
→ |
Renewed Cold Rupture
|
 Latent Crack of the Heavens
|
+ | Perfect Topaz |
+ | Fal |
+ | Southern Worldstone Shard |
→ |
Renewed C.O.T.H
|
 Latent Flame Rift
|
+ | Perfect Ruby |
+ | Io |
+ | Deep Worldstone Shard |
→ |
Renewed Flame Rift
|
 Latent Rotting Fissure
|
+ | Perfect Emerald |
+ | Ko |
+ | West Worldstone Shard |
→ |
Renewed Rotting Fissure
|
Optimal Crafting
You have a 100% chance to receive four affixes on your crafted item if the inputs yield an item level 71+. Both your level and the input item level matter. Unfortunately, due to which effects players desire on items, there are very specific levels you must shop at and craft to optimize your output. Only the most popular crafting recipes are shown. For a full list, see Maxroll's crafting guide.
 Any Staff
|
+ |
 Any Kris
|
+ | Any Diamond |
+ |
 Any Belt
|
→ |
 Savage Polearm*
|
 Magic Casque*
|
+ | Ral |
+ | Perfect Ruby |
+ |  Any jewel Any jewel |
→ |
Blood Helm*
|
 Magic Sharkskin Gloves*
|
+ | Nef |
+ | Perfect Ruby |
+ | Any jewel |
→ |
Blood Gloves*, best at Clvl 69-72, 76-77
|
|
Magic Mesh Belt*
|
+ | Tal |
+ | Perfect Ruby |
+ | Any jewel |
→ |
Blood Belt*, best at Clvl 88+
|
 Magic Battle Boots*
|
+ | Eth |
+ | Perfect Ruby |
+ | Any jewel |
→ |
Blood Boots*, best at Clvl 88+
|
|
Magic Amulet*
|
+ | Amn |
+ | Perfect Ruby |
+ | Any jewel |
→ |
Blood Amulet*, best at Clvl 93+
|
 Magic Ring*
|
+ | Sol |
+ | Perfect Ruby |
+ | Any jewel |
→ |
Blood Ring*, best at Clvl 80-83, 83+
|
 Magic Sharkskin Belt*
|
+ | Ith |
+ | Perfect Amethyst |
+ | Any jewel |
→ |
Caster Belt*, best at Clvl 88+
|
 Magic Demonhide Boots*
|
+ | Thul |
+ | Perfect Amethyst |
+ | Any jewel |
→ |
Caster Boots*, best at Clvl 88+
|
 Magic Amulet
|
+ | Ral |
+ | Perfect Amethyst |
+ | Any jewel |
→ |
Caster Amulet*, best at Clvl 93+
|
 Magic Heavy Bracers*
|
+ | Ort |
+ | Perfect Sapphire |
+ | Any jewel |
→ |
Hit Power Gloves*, best at Clvl 69-71, 77-78
|
Farming / Bases
Powerleveling
These are the best ways to powerlevel characters. Farm XP using /players 8 or as many people as you can get online. If you are above level 70, obtain an Annihilus for the XP boost.
| For Clvl | Difficulty | Powerleveling Strategy |
|---|---|---|
| 1-15 | n | Normal Rakanishu and Tristram runs |
| 15-20 | n | Normal Tomb runs (clear all seven tombs, ignore Duriel) |
| 20-24 | n | Normal Cow runs |
| 24 | n | Complete normal Rite of Passage |
| 24-40 | n | Normal Baal runs |
| 40 | NM | Complete Nightmare Rite of Passage |
| 40-60 | NM | Nightmare Baal runs |
| 60 | Hell | Complete the Hell Rite of Passage |
| 61-99 | Hell | Hell Baal runs, Hell Chaos Sanctuary runs |
Commonly Needed Bases & Shopping
When farming items from Cows, use 0% Magic Find so that more white and socketed bases drop for you. The cube recipe for adding sockets is not guaranteed, but for items with 4os max, the chance is 50%.
| Desired Item | Goal | Where to Get |
|---|---|---|
 3os Bow/Crossbow 3os Bow/Crossbow |
Edge runeword | Shop normal Charsi, Clvl 13 or below |
 +X/+X Necro Wand +X/+X Necro Wand |
White runeword | Shop normal Akara/Drognan, Clvl 13 or below, only Bone Wands / Grim Wands can get 2os |
| +X/+X Fire Staff |
Leaf runeword | Shop normal Akara/Drognan, Clvl 13 or below |
 3os Flail 3os Flail |
Black, Steel runeword | Shop normal Fara, Clvl 13 or below |
 3os Mace 3os Mace |
Black runeword | Shop normal Fara, Clvl 13 or below |
 Teleport Staff Teleport Staff |
Cheap Teleport charges | Shop normal Ormus between Clvl 19-24 |
 Lower Resist Wand Lower Resist Wand |
Lower Resist charges | Shop Hell Drognan/Malah at Clvl 30+ |
| Life Tap Wand |
Life Tap charges | Shop normal Ormus/Malah |
 3os Large Shield 3os Large Shield |
Early Ancient's Pledge | Shop normal Fara |
| 4os Polearm |
Early Insight runeword | Find white from normal Cows, socket with quest or cube for 4os |
 4os Crystal Sword 4os Crystal Sword |
Spirit runeword | Find white from normal Cows, socket with quest or cube for 4os |
 4os Monarch 4os Monarch |
Spirit runeword | Find from Hell Cows (if white, socket with quest or cube for 4os) |
 4os Paladin Shields 4os Paladin Shields |
Spirit runeword | Find from Hell Cows (if white, socket with quest or cube for 4os) |
| 4os Flail |
Heart of the Oak runeword | Find white from normal Cows, socket with quest or cube for 4os |
 4os Thresher / GT 4os Thresher / GT |
Final Insight or Infinity | Find socketed (and ideally ethereal) from Hell Cows |
 Socketed Elite Armor Socketed Elite Armor |
Final armor runeword | Find socketed from Hell Cows (or white and socket with quest or cube if max sockets desired) |
 Cunning Claws of Quickness Cunning Claws of Quickness |
Trapsin | Shop Hell Anya, Clvl 75+ |
| Lancer's Gloves of Alacrity |
Javazon | Shop Hell Anya, Clvl 75+ |
| Archers Gloves of Alacrity |
Bow Amazon | Shop Hell Anya, Clvl 75+ |
Loot Farming Guide
In general, farming Cows is useful when you want a high density of enemies and more items to drop, which is why Cows tend to be best for runes or socketable bases. For Holy Grail items or every possible item, bosses or level 85 champion areas are usually best.
| To Farm | Do This |
|---|---|
 Gold Gold |
Farm Travincal council, or sell drops from bosses and other farming |
| Chipped Gems |
Farm anywhere in Normal Act I or Normal Cows |
| Other Gems |
Farm Hell Cows |
| Socket Bases |
Farm Normal Cows or Hell Cows (item-specific, use 0% Magic Find, see bases table) |
 Jewels / Facets Jewels / Facets |
Hell Cows or champion areas (see next table) |
 Charms Charms |
Farm Hell Cows or champion areas (see next table) |
| Re-rollable Charms |
Farm Hell Diablo, Hell Baal, and Hell Nihlathak (other bosses do not drop high enough level charms) |
| Gheed's Fortune |
Farm Hell Cows |
| Stone of Jordan |
Farm Nightmare Andariel |
 Uniques / Set Items Uniques / Set Items |
Farm Hell Pindleskin, Hell Andariel, or Hell Mephisto |
 Holy Grail Items Holy Grail Items |
Farm champion areas (see next table) |
| Godly Rares |
Farm champion areas (see next table) |
| Low or Middle Tier Runes |
Farm Nightmare Cows or all difficulties of Countess (see rune table) |
| High Teir Runes |
Farm Hell Cows, Travincal council, or champion areas (see next table) |
| Key of Terror |
Farm Hell Countess: p1 drop chance 1:14, p3 drop chance 1:11, higher player counts not optimal |
| Key of Hate |
Farm Hell Summoner: p1 drop chance 1:11, p3 drop chance 1:8, higher player counts not optimal |
| Key of Destruction |
Farm Hell Nihlathak: p1 drop chance 1:12, p3 drop chance 1:9, higher player counts not optimal |
Champion / Level 85+ Area Farming
The areas listed below drop items lvl 85 and up, and provide the best chance to receive any item in the game or the best rares. Choose areas with immunities you won't encounter to make farming more brainless.
| Champion Area (Hell Difficulty) | Nearest Waypoint | Champ. Packs | Possible Immunities | |||||
|---|---|---|---|---|---|---|---|---|
| Mausoleum | Cold Plains | 4–5 | Light. | |||||
| Underground Passage L2 | Stony Field | 2+ | Fire | Cold | Light. | Psn. | ||
| The Pit L1 | Tamoe Highland | 6–8 | Fire | Cold | Light. | |||
| The Pit L2 | Tamoe Highland | 2–3 | Fire | Cold | Light. | |||
| Stony Tomb L1 | Dry Hills | 6–8 | Light. | Psn. | ||||
| Stony Tomb L2 | Dry Hills | 3–4 | Light. | Psn. | ||||
| Maggot Lair L3 | Far Oasis | 4–5 | Light. | Psn. | Phys. | |||
| Ancient Tunnels | Lost City | 6–8 | Fire | Light. | Psn. | Phys. | Magic | |
| Arachnid Lair | Spider Forest | 4–5 | Fire | Light. | Psn. | |||
| Swampy Pit L1 | Flayer Jungle | 5–6 | Light. | Psn. | ||||
| Swampy Pit L2 | Flayer Jungle | 5 | Fire | Light. | Psn. | |||
| Swampy Pit L3 | Flayer Jungle | 5–6 | Light. | Psn. | ||||
| Disused Fane | Kurast Bazaar | 4 | Cold | Light. | Psn. | Phys. | Magic | |
| Ruined Temple | Kurast Bazaar | 4 | Fire | Cold | Magic | |||
| Sewers L1 | Kurast Bazaar | 6–7 | Cold | Light. | Psn. | Magic | ||
| Forgotten Temple | Upper Kurast | 2 | Fire | Cold | Light. | |||
| Forgotten Reliquary | Upper Kurast | 4 | Fire | Cold | Magic | |||
| Disused Reliquary | Upper Kurast | 2 | Fire | Cold | Light. | |||
| River of Flame | River of Flame | 6–7 | Fire | Cold | Light. | Psn. | ||
| Chaos Sanctuary | River of Flame | 6–7 | Fire | Cold | Light. | |||
| Abaddon | Frigid Highlands | 6–8 | Fire | Cold | Light. | Psn. | Phys. | |
| Pit of Acheron | Arreat Plateau | 6–8 | Fire | Cold | Psn. | Phys. | Magic | |
| Drifter Cavern | Glacial Trail | 6–8 | Fire | Cold | Light. | Psn. | Phys. | |
| Infernal Pit | Frozen Tundra | 5–7 | Fire | Cold | Light. | Psn. | Phys. | Magic |
| Icy Cellar | Ancients' Way | 6–8 | Cold | Light. | Psn. | Phys. | ||
| Worldstone Keep L1 | Worldstone Keep L2 | 6–8 | Fire | Cold | Light. | |||
| Worldstone Keep L2 | Worldstone Keep L2 | 6–8 | Fire | Cold | Light. | Psn. | Magic | |
| Worldstone Keep L3 | Worldstone Keep L2 | 6–8 | Fire | Cold | Light. | Psn. | Phys. | Magic |
| Throne of Destruction | Worldstone Keep L2 | 6–8 | Fire | Cold | Light. | Psn. | Phys. | Magic |
Other Resources / Links
Other Charts
Armor Appearance Chart Warlock Appearance ChartOther Tools
Maxroll.gg Map Reading Guide Maxroll.gg D2 Planner Maxroll.gg Drop Calculator Silospen Drop Calculator RunewizardMeta
The Story So Far Blizzard Tracker Blizzard Support TwitterBase Equipment
Base Armor Base Boots Base Belts Base Circlets Base Gloves Base HelmsBase Axes Base Bows Base Crossbows Base Daggers Base Javelins Base Maces Base Polearms Base Scepters Base Shields Base Spears Base Staves Base Swords Base Throwing Base Wands
Amazon Items Assassin Items Barbarian Items Druid Items Necro Items Paladin Items Sorceress Items
Unique Items
Unique Charms Unique JewelsUnique Amulets Unique Belts Unique Armor Unique Boots Unique Gloves Unique Helms Unique Rings
Unique Axes Unique Bows Unique Crossbows Unique Daggers Unique Javelins Unique Maces Unique Polearms Unique Scepters Unique Shields Unique Spears Unique Staves Unique Swords Unique Throwing Unique Wands
Unique Amazon Unique Assassin Unique Barbarian Unique Druid Unique Necro Unique Paladin Unique Sorceress